My wonderful wife gave me a gift card for Christmasa to my local wargame store (Tabletop Games and Hobbies - great store). I knew she was going to do this, so a few days before Christmas I went down there to scout around for what I might get.
I had seen Optivisors in advertisements for years. The store had some, and I asked the Phil (the owner) if it really worked. His answer was that it gave his hobby back to him. His eyesight had gotten bad enough that he was getting very frustrated trying to see what he was painting. He said it allowed him to easily see the figures well enough to paint.
They come in 4 different focal lengths, and he had me hold a figure and brush at the distance I would be comfortable painting. He then measured that distance, and recommended the 14" focal length model. He was quick to tell me to keep the packaging, because if I needed a different one he could swap it out.
If it sounds like we have a really great local wargame store, with a really good proprietor, you would be right.
So I get home, and tell my wife about this and that I would be heading to the store the day after Christmas to get it. She gets the gift card and tells me we are going to get it now. :) (Have I mentioned that I have one of the most wonderful women in the world for my wife?)
The optivisor was all that Phil said and more. Its simple, it has an adjustable band that holds it on your head, even my unusually large long oval head. You wear your glasses with it, it doesn't make any difference. I have a lighted magnifying glass on an adjustable stand, but I couldn't use it. It seemed to flatten everything out and I had trouble controlling the brush. The optivisor is binocular, so you see in 3 dimensions. It works incredibly well. I have been able to paint more in the last 2 weeks than I did in the past 4 months.
I really recommend this product for anyone who is having trouble with close work. Its probably the best $50 I ever spent on the hobby.
Saturday, January 14, 2012
Sunday, December 18, 2011
Tomorrow's War - First Playtest
Ken and I tried Tomorrow's War this morning. We set up a small scenario featuring Ken's terrific collection of post apocalyptic terrain and his 28 mm figures.
First, let me say that we were impressed by how the game went. Once we got the hang of the system, it went pretty quickly. We both liked the action/reaction system. I got the initiative the first turn, and never lost it. That meant Ken was basically reacting to what I did for the most part, but it was not a problem.
We each had 3 fireteams of 4 guys each. Each fireteam had one guy with a 2 die support weapon of some kind, so except for the unit with the flamer, the fireteams at full strength were 4 D8 plus 2 D8 for a total of 6 D8. Each side also had a walker. We were not sure how to handle these. We finally went for powered armor that carried support weapons. We may do some more tweaking on how we do this. This is one of the first problems we encountered. While they have examples from their "universe" in the book, some things are left to the imagination of the gamer on how to define the units. That is good in that it makes the game very flexible. Its bad when you are setting up a scenario to try out the game.
Ok, they do have scenarios that you can set up to learn the rules, but who really does that? :)
The whole business of how you do casualties took us a bit to figure out. We may still be doing it wrong. That is one of the things we are going to go over carefully.
Ok, probably time for another picture. I apologize that these don't really tell a story. This one is from the end of the game. I had trashed Ken's walker and killed the fireteam close to it. He also lost another fireteam by rolling 1s for every person hit. That kills them outright.
The game requires you to roll for casualties to see how bad they are. This whole system worked better than we thought it would when we first read it. It looked like it would be really clunky. In practice, it wasn't a problem.
The rules are advertised for both 15mm and 28mm figures. For me there is no question. I would play with 28s. I don't like trying to fiddle with individually based 15s. They are too small for me.
The rules physically are a problem for me. They are in a hardback book. It has small black print on a blue-grey mottled background. I can only read it up close in bright light. My 57 year old eyes just can't handle it. If we play these rules (and I think we will) I will probably pay for a pdf copy and see if I can find someone who wants to buy the hardback. I have heard that the pdf has an option to print the rules clean, without the colored background.
The QRS that you download off of Ambush Alley game is 4 pages. I found one on the web that someone had made for himself that was 2 pages. It gives page numbers for the actual rule in a lot of the sections. .It was useful. I didn't bother to print the one from Ambush Alley.
We are at this point planning on playing more and are going to try it out on our gaming group when we are good enough at it to help other people over the learning curve.
We are still looking for a "big battle" set for 15mm figures with multiple figures on the base.
Back side of a rubbled building I was using for cover. My medic is cowering in cover. His explanation is that he is keeping squad cohesion.
High tide of Ken's troops. By the time this fireteam reached the heavy cover, they were the only surviving troops on his side.
First, let me say that we were impressed by how the game went. Once we got the hang of the system, it went pretty quickly. We both liked the action/reaction system. I got the initiative the first turn, and never lost it. That meant Ken was basically reacting to what I did for the most part, but it was not a problem.
We each had 3 fireteams of 4 guys each. Each fireteam had one guy with a 2 die support weapon of some kind, so except for the unit with the flamer, the fireteams at full strength were 4 D8 plus 2 D8 for a total of 6 D8. Each side also had a walker. We were not sure how to handle these. We finally went for powered armor that carried support weapons. We may do some more tweaking on how we do this. This is one of the first problems we encountered. While they have examples from their "universe" in the book, some things are left to the imagination of the gamer on how to define the units. That is good in that it makes the game very flexible. Its bad when you are setting up a scenario to try out the game.
Ok, they do have scenarios that you can set up to learn the rules, but who really does that? :)
The whole business of how you do casualties took us a bit to figure out. We may still be doing it wrong. That is one of the things we are going to go over carefully.
Ok, probably time for another picture. I apologize that these don't really tell a story. This one is from the end of the game. I had trashed Ken's walker and killed the fireteam close to it. He also lost another fireteam by rolling 1s for every person hit. That kills them outright.
The game requires you to roll for casualties to see how bad they are. This whole system worked better than we thought it would when we first read it. It looked like it would be really clunky. In practice, it wasn't a problem.
The rules are advertised for both 15mm and 28mm figures. For me there is no question. I would play with 28s. I don't like trying to fiddle with individually based 15s. They are too small for me.
The rules physically are a problem for me. They are in a hardback book. It has small black print on a blue-grey mottled background. I can only read it up close in bright light. My 57 year old eyes just can't handle it. If we play these rules (and I think we will) I will probably pay for a pdf copy and see if I can find someone who wants to buy the hardback. I have heard that the pdf has an option to print the rules clean, without the colored background.
The QRS that you download off of Ambush Alley game is 4 pages. I found one on the web that someone had made for himself that was 2 pages. It gives page numbers for the actual rule in a lot of the sections. .It was useful. I didn't bother to print the one from Ambush Alley.
We are at this point planning on playing more and are going to try it out on our gaming group when we are good enough at it to help other people over the learning curve.
We are still looking for a "big battle" set for 15mm figures with multiple figures on the base.
Back side of a rubbled building I was using for cover. My medic is cowering in cover. His explanation is that he is keeping squad cohesion.
High tide of Ken's troops. By the time this fireteam reached the heavy cover, they were the only surviving troops on his side.
Sunday, October 16, 2011
A little progress at last..
I have not posted in way too long. I have had some health issues, and got sidetracked with some online gaming. I have fooled around a little with some painting, but haven't really finished anything in awhile.
I did buy some pretty neat 55 gallon drums recently. I decided to go ahead and put them on bases. Not sure why, they would be fine without it, but here they are.
I figure this will be useful for skirmish gaming with either science fiction or post apocalyptic.
I also based a mech and a vehicle for the fast play rules we use for mechs.
The other project I currently have going is 2 bases for Fast Play Grande Armee. I am doing a couple of stands of Rhine Confederation figures in 6mm. Now, I have not painted anything this small in years. I am not sure how they are going to come out.
I did buy some pretty neat 55 gallon drums recently. I decided to go ahead and put them on bases. Not sure why, they would be fine without it, but here they are.
I figure this will be useful for skirmish gaming with either science fiction or post apocalyptic.
I also based a mech and a vehicle for the fast play rules we use for mechs.
The other project I currently have going is 2 bases for Fast Play Grande Armee. I am doing a couple of stands of Rhine Confederation figures in 6mm. Now, I have not painted anything this small in years. I am not sure how they are going to come out.
Sunday, September 11, 2011
Changes
I went to the local Con this weekend, Recruits. Now, Recruits is a great con. It has a lot of good games, it brings in new gamers, and the dealers area is always interesting. I just couldn't get into it.
Part of the problem is that I don't hear as well now, and a large room with constant loud background noise means I can't hear a lot of what the GM is trying to tell us.
I got into one of the prettiest games I have ever seen. Its a huge pirate game in 25mm. The amount of work that went into it was amazing. Unfortunately, with about 18 people in it, many of them teenagers, it was interminably slow. I gave up my ship command to someone else about 4 pm. It started at 1 and we had played 3 turns.
I think that except for going to look at the dealer area, my days of con games are over. I also can't stand that long, and paid for the time with a lot of leg pain.
I started thinking about this, and I am ok with it. I really enjoy the games I play weekly with my regular gaming group, so con games are not a large part of my gaming life anyway.
This has been a more personal post than any I have done before, but what the heck, its my blog. :)
Part of the problem is that I don't hear as well now, and a large room with constant loud background noise means I can't hear a lot of what the GM is trying to tell us.
I got into one of the prettiest games I have ever seen. Its a huge pirate game in 25mm. The amount of work that went into it was amazing. Unfortunately, with about 18 people in it, many of them teenagers, it was interminably slow. I gave up my ship command to someone else about 4 pm. It started at 1 and we had played 3 turns.
I think that except for going to look at the dealer area, my days of con games are over. I also can't stand that long, and paid for the time with a lot of leg pain.
I started thinking about this, and I am ok with it. I really enjoy the games I play weekly with my regular gaming group, so con games are not a large part of my gaming life anyway.
This has been a more personal post than any I have done before, but what the heck, its my blog. :)
Sunday, July 24, 2011
Some small projects
I have been working on some small projects, and finished a few.
First, another $5 special from Michael's.
I didn't want to spend a lot of time on this. It was another birdhouse. It had a smaller structure on top, but it didn't leave enough room around the edges to put figures. A quick whack with a rubber mallet removed the offending structure. It left a pretty rough surface on top, because the glue kind of tore wood out. I put in some craft sticks, used some more to make a door and frame it (to cover the big hole for the birdhouse) and painted it. Its a bit dark where I paint, and my eyes are not what they should be. I apparently need to do a bit of drybrushing with gray, as I got door paint on the wall.
The next thing I have been working on is Mech stuff. We are playtesting a quick game for mechs, and we use the click stuff as its very cheap online. All I do is rebase it, and here is the result.
The final project is my retro space guys for Blasters and Bulkheads. I finished the bases and sprayed them with Dullcoat.
I am getting enough posts that I need to figure out the tagging business. I have been poking around in the blogspot stuff, but haven't figured it out yet.
I am still working on my Seven Years War stuff. I have a couple of artillery stands almost ready to go, and another battalion of Musketeers. My buying has been slowed lately because of house repairs. Its always something.
First, another $5 special from Michael's.
I didn't want to spend a lot of time on this. It was another birdhouse. It had a smaller structure on top, but it didn't leave enough room around the edges to put figures. A quick whack with a rubber mallet removed the offending structure. It left a pretty rough surface on top, because the glue kind of tore wood out. I put in some craft sticks, used some more to make a door and frame it (to cover the big hole for the birdhouse) and painted it. Its a bit dark where I paint, and my eyes are not what they should be. I apparently need to do a bit of drybrushing with gray, as I got door paint on the wall.
The next thing I have been working on is Mech stuff. We are playtesting a quick game for mechs, and we use the click stuff as its very cheap online. All I do is rebase it, and here is the result.
The final project is my retro space guys for Blasters and Bulkheads. I finished the bases and sprayed them with Dullcoat.
I am getting enough posts that I need to figure out the tagging business. I have been poking around in the blogspot stuff, but haven't figured it out yet.
I am still working on my Seven Years War stuff. I have a couple of artillery stands almost ready to go, and another battalion of Musketeers. My buying has been slowed lately because of house repairs. Its always something.
Sunday, July 17, 2011
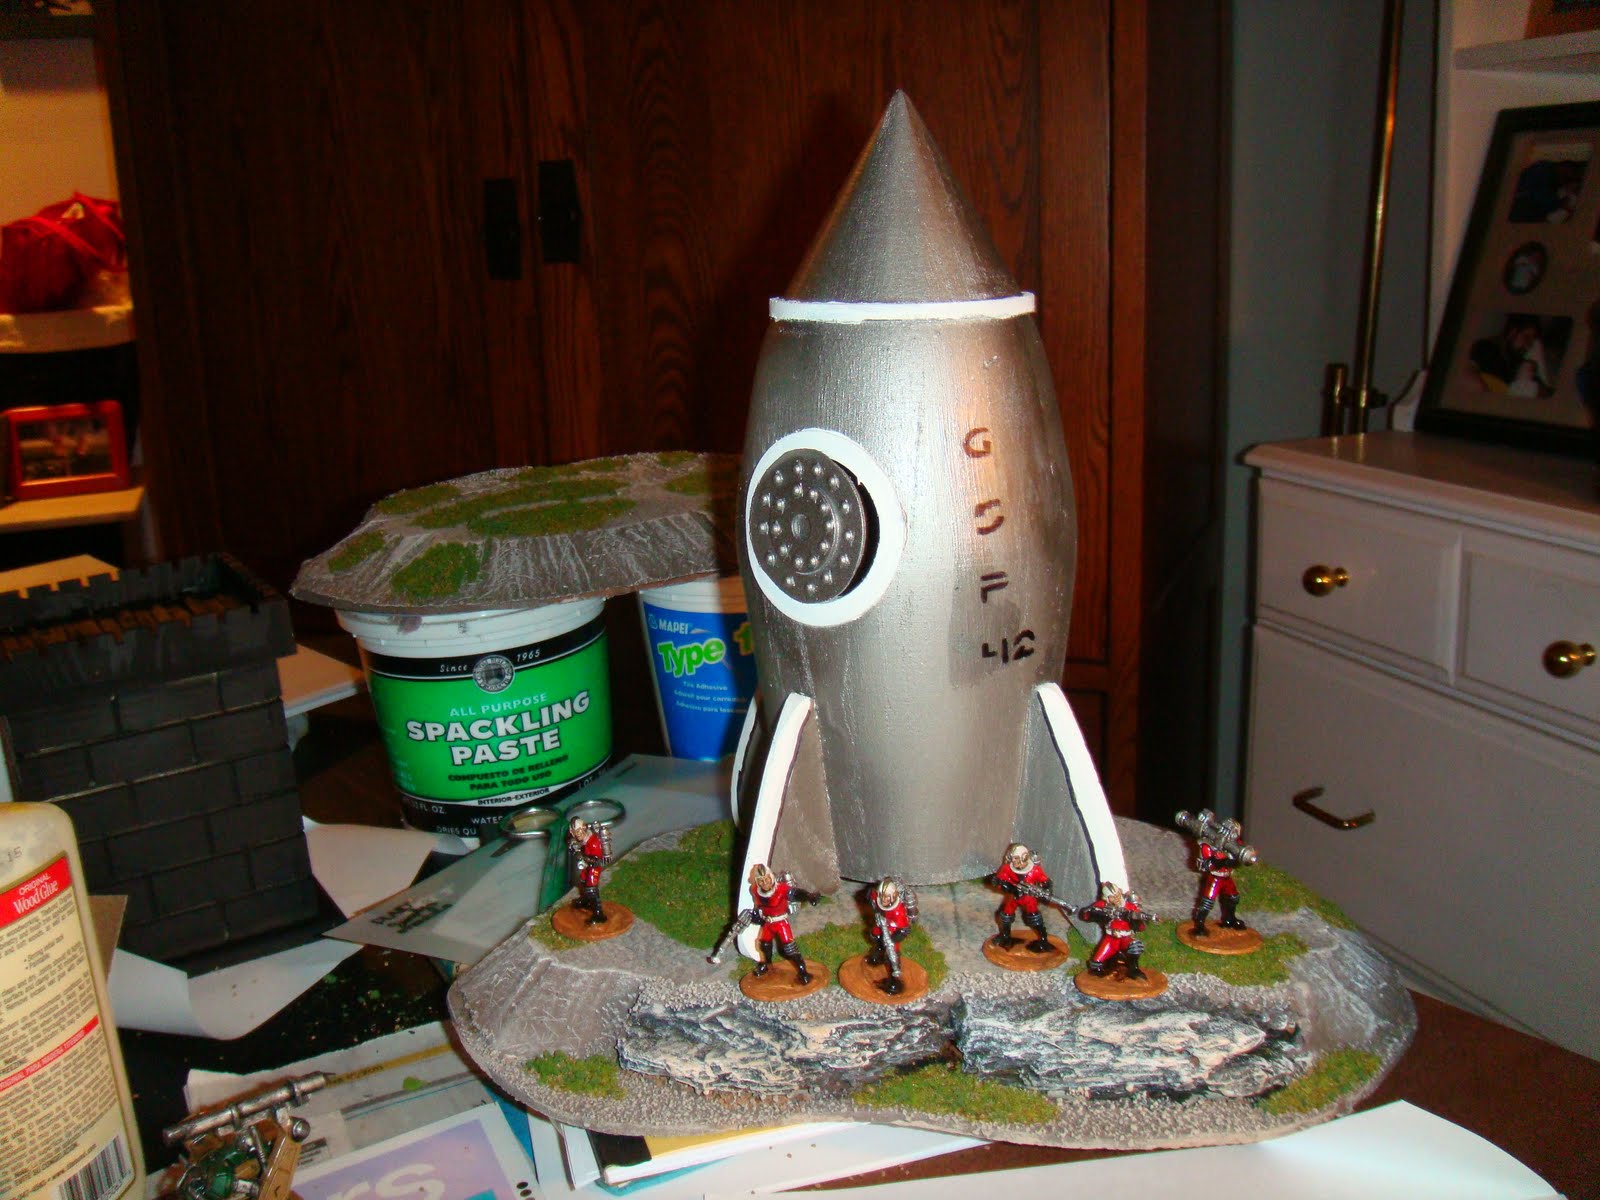
Galactic Space Patrol 42, the GSP Beagle
She started life as a short haul freighter. The Galactic Space Patrol was new and looking for ships for exploration. They bought her, gave her the name Beagle, and she soldiered on for years. She was about to go to the breakers yard, when the Patrol had one last duty for her. As an old tramp freighter, she could get into places where a Patrol Cutter would stand out like a sore thumb. They gave her a full suite of brand new electronics, a new Mannschenn Drive, and she was ready skulk around the rougher corners of the galaxy, putting Patrol teams into danger.
Our group recently started playtesting Blasters and Bulkheads, the pulp science fiction game using the Goal System. I found some figures, and then at Michael's for about $6, I found this:
I think, from the big hole in the side, its supposed to be a decorative birdhouse. The first problem was to make a hatch. I am not the greatest scratchbuilder around, so with a Litko base, some plastic, and little "jewels" also from Michaels, I came up with this.
The goal system is for small groups of figures, so I bought a few figures and painted them up. I still need to add some dullcoat, I did the "dip" method on them.
So now I have a contingent for the game. If they get into action, I will post more pictures. I decided that the huge hatch on the ship is to make cargo handling easier. That's my story, and I am sticking to it.
Wednesday, June 15, 2011
Making Hills
Since I sold all my wargaming stuff a few years ago, I am starting from scratch. I decided to take a short break from painting and make a couple of hills using techniques stolen from other blogs.
The hills probably need to be taller and larger. They are made from 1" foam. I cut a hardboard base, then hotglued pine bark along one side to make cliffs. I then cut out foam to the basic shape of the base minus the area where I put the bark. I glued the foam to the hardboard, and after it dried used a foamcutter to cut an angle along the edge of the hill.
The foamcutter is a new one I recently bought at Hobby Lobby. It has a straight wire about 5" long that gets hot. Its nice, you can sculpt with it. It does cool off a bit making long cuts, but it keeps cutting but a bit slower.
After that was done, I used some little pieces of foam and spackle to fill in the gaps between the pine bark and the foam. I then used a technique that a local game store owner told me about. I covered the entire thing with latex tile mastic. You get a cheap brush, because the brush ain't comin' back from this mission, and load it with water. Swirl it in the mastic to make it a bit more liquid and then just paint it on the whole thing. It seals up the foam and makes it easier to paint, and it gives a nice skin to the foam that makes it a bit tougher. The brushes I got were 99 cents each, and the one I used was completely trashed when I finished.
After that dried, which takes about a day, I glued on a bit of railroad ballast around the top and bottom of the cliff. I had bought 2 quarts of paint, one darker brown, one lighter brown, from the local hardward store. I painted the darker color all over the foam and the area where the ballast was, using a 1" brush. (a better brush than before, this one I will reuse) Then I painted the bark a very dark gray.
After that dried I took the lighter brown color (really a light tan) and dry brushed the whole thing, including the rocks. I then used a little bit of white and light yellow to drybrush all over everything.
The final step was to put some flocking on parts of the hill. I used to have hills that looked like green lawns. I have decided I like a more mottled look.
The results are below. I will probably put some kind of final coat on to fix everything, but its basically done.
The hills probably need to be taller and larger. They are made from 1" foam. I cut a hardboard base, then hotglued pine bark along one side to make cliffs. I then cut out foam to the basic shape of the base minus the area where I put the bark. I glued the foam to the hardboard, and after it dried used a foamcutter to cut an angle along the edge of the hill.
The foamcutter is a new one I recently bought at Hobby Lobby. It has a straight wire about 5" long that gets hot. Its nice, you can sculpt with it. It does cool off a bit making long cuts, but it keeps cutting but a bit slower.
After that was done, I used some little pieces of foam and spackle to fill in the gaps between the pine bark and the foam. I then used a technique that a local game store owner told me about. I covered the entire thing with latex tile mastic. You get a cheap brush, because the brush ain't comin' back from this mission, and load it with water. Swirl it in the mastic to make it a bit more liquid and then just paint it on the whole thing. It seals up the foam and makes it easier to paint, and it gives a nice skin to the foam that makes it a bit tougher. The brushes I got were 99 cents each, and the one I used was completely trashed when I finished.
After that dried, which takes about a day, I glued on a bit of railroad ballast around the top and bottom of the cliff. I had bought 2 quarts of paint, one darker brown, one lighter brown, from the local hardward store. I painted the darker color all over the foam and the area where the ballast was, using a 1" brush. (a better brush than before, this one I will reuse) Then I painted the bark a very dark gray.
After that dried I took the lighter brown color (really a light tan) and dry brushed the whole thing, including the rocks. I then used a little bit of white and light yellow to drybrush all over everything.
The final step was to put some flocking on parts of the hill. I used to have hills that looked like green lawns. I have decided I like a more mottled look.
The results are below. I will probably put some kind of final coat on to fix everything, but its basically done.
Subscribe to:
Posts (Atom)